Thursday, September 27, 2012

How to convert SVG data to a Png Image file Using InkScape

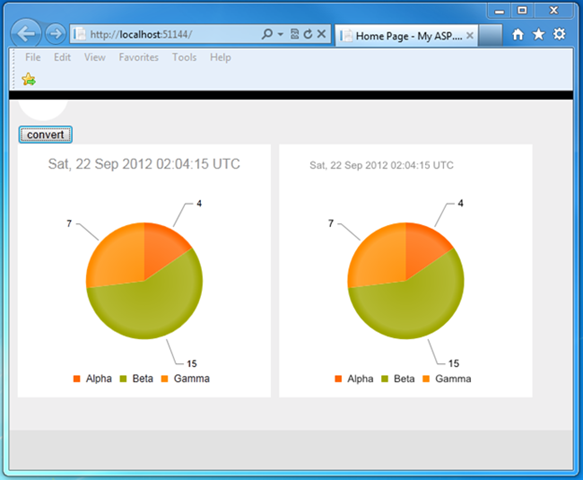
Introduction

The project required the need to put the visual pie chart on a web page on the client and in a Pdf file created on the server. I eventually choose to use a Telerik Kendo DataViz Chart control on the client, and use a PNG file on the server for the Pdf file. This blog post will explain the process and code to convert the client-side pie chart Svg data to a Png file, and provide a download to the working code.

Prerequisites

You need to have a trial version of the Telerik Kendo library installed in order to make the sample code work. You also need InkScape installed. InkScape is the application that does the actual conversion. You will need to change the Web.config appSetting of “ExeDirectoryForInkscape” to represent your own installation location.

Any SVG Data Will Work

The pie chart was created using the Telerik Kendo DataViz chart control. While I name a specific control, as long as you have access to the SVG data, the same conversion process on the server will work.

The Sample App

The sample application is a Asp.Net MVC 4.0 C# application with a pie chart via the Kendo JavaScript library. Above the pie chart is a convert button and to the right of the JavaScript pie chart is the final converted Png image.


image

Not Pixel-Perfect

You can see from the image above that the conversion is close but not perfect. The title of the chart, the date and time, is larger on the left than on the right. If you need pixel-perfect conversion, this method is not for you. If you can tolerate minor discrepancies, InkScape is a great conversion tool.

Grab the SVG Data

Since the Telerik Kendo UI pie chart is on the client, the JavaScript needs to grab the data and send it to the server for conversion.


function getPieChartPngImage() {

    "use strict";

    // get svg data from Telerik Kendo Pie Chart
   
var piechart = $("#piechart").data("kendoChart");

    // prepare string by escaping it
   
var svgPieString = escape(piechart.svg());

    // send svg data to server
   
$.ajax({
        url: '/Home/SvgToPng/',
        type: 'POST',
        data: {
            // actual data
           
svgpie: svgPieString
        },
        // webImageFileLocation is the UNC path to the converted image
       
success: function (webImageFileLocation) {

            // load UNC path into image's src attribute
           
$('#image').attr('src', webImageFileLocation);

        },
        error: function () {
            alert('error in call to /Home/SvgToPng/');
        }
    });
}

The Controller & Method

The SvgToPng controller method gets the UrlDecoded string and passes it to the SvgToPng.Save method along with the Server.MapPath of the location of where to save the converted file. It returns a file path which is then converted into the UNC path. Then the UNC path is returned to the client for use in an <IMAGE> src attribute.

[HttpPost]
public JsonResult SvgToPng(string svgpie)
{
    SvgToPng svgToPng = new SvgToPng(null);

    // convert svg data to png file
    string gridPngFileLocation = svgToPng.Save(HttpUtility.UrlDecode(svgpie), "sample", "pie", Server.MapPath("~/Content/Images"));

    // convert file path back to unc
    string uncPath = gridPngFileLocation.Replace(Request.ServerVariables["APPL_PHYSICAL_PATH"], "/").Replace(@"\", "/");

    return Json(uncPath);
}

Using InkScape

The InkScape code is in a separate class library in the application. There are several things it needs to do


  1. Set the file name
  2. Grab the Exe location from the Web.config for InkScape
  3. Save SVG data to a file
  4. Convert SVG file to a PNG file

I’m going to assume you can read the code for yourself for the first three steps. I’ll skip to the last step.

Conversion Process

The conversion process is in Convert(string fileAndPathToSvg, string newFileAndPathToPng). The command line arguments for InkScape are built up:

this.CmdLineArgs = "-f " + fileAndPathToSvg + " -e " + newFileAndPathToPng;


Then the InkScape location and command line arguments are passed into the CommandLineThread(this.ExeLocation, this.CmdLineArgs) method where a new process is created to execute in the shell.

private void CommandLineThread(string inkscapeCmdLine, string cmdLineArgs)
{
    if ((string.IsNullOrEmpty(inkscapeCmdLine)) || (!inkscapeCmdLine.Contains(".exe")))
    {
        throw new Exception("command line empty or doesn't contain exe: " + inkscapeCmdLine);
    }

    Process inkscape = new Process();

    inkscape.StartInfo.FileName = inkscapeCmdLine;
    inkscape.StartInfo.Arguments = cmdLineArgs;
    inkscape.StartInfo.UseShellExecute = false;
   inkscape.Start();

    inkscape.WaitForExit();
}

At this point the Png file and the Svg file should both be on the file system. All the application has to return is the location of the Png file as a UNC path that the <IMAGE> tag can use.


Download The Code

The Visual Studio 2010 project is available on Github.

Summary

The conversion of a Svg data string to a Png file is easy with the InkScape application. Calling InkScape from a process using the shell is the actual conversion process. Then the location of the converted file is the only information the client browser needs to display it.

Thursday, September 13, 2012

Restyling an Html <SELECT> Element from a Telerik Kendo Panel Bar

Introduction

Recently, I needed to restyle an HTML <SELECT> box so that the selected element had a different background color. In all other ways, the element could be exactly like an HTML <SELECT>. Below are both the original element, and the restyled element.


clip_image001


This type of style change allows the novice user to immediately identify the control’s implied usage while allowing for some coordination with the site and page’s overall style.


Technology Platform

The project is an Asp.net MVC site with jQuery, and Knockout.js on the front-end requesting json content on the backend. For the purposes of this blog post, I’ve stripped down the functionality so that just the required elements are visible.

The project was already using Telerik Kendo controls so morphing the Kendo Panel Bar into a <SELECT> element was suggested.

The main work is in the css file but the entire working sample project is available for download.


Telerik Kendo Trial Version

The Telerik Kendo JavaScript files in the demo are part of a trial installation. Please make sure you install the trial version of Kendo in order to make sure the trial works for you. Make sure to update the Kendo files if your installed trial has more recent versions.


Kendo Styling

Kendo controls come with complete styling in several themes. In order to override the style of the panel bar, very few css styles need to change. Below is an image of the default Kendo Panel Bar.


clip_image002


The main issues with the default styles are the background color, text color, the item separator (line), and the hover/selected styles.


Restyling (SelectDDL.css)

In order to override the default style of the items, add an entry for “.k-item > .k-link” to the style sheet.


#panelbar .k-item > .k-link
{
    /* remove default styles Kendo provides */
   
font-family: Segoe UI,Verdana,Helvetica,Sans-Serif;
    display: block;
    position: relative;
    font-size: 0.93em;
    border-bottom-style: none; /* next 3 lines remove line separator */
   
border-bottom-width: 0px;
    border-bottom-color: transparent;
    padding-left: 2px;
    line-height: normal;
    text-decoration: none;
    zoom: 1;
    white-space: nowrap;
    background-image: none; /* get rid of image kendo uses to diminish highlight color of selected item */
   
color: #000000;         /* overwrite default grey color */   
   
background-color: #ffffff;
}


The next area to restyle is the actions: hover and selected. When the item is hovered over in an html <SELECT> element, there is no change in background color or text color. In order to reproduce that for the Kendo control, change the “.k-state-hover:hover” style for the items.

#panelbar .k-state-hover:hover
{
   /* control the colors when item is hovered  */ 
   background-color: #ffffff;
   color: #000000;
}

Now that all the Kendo styling has been ripped out, the html <SELECT> element styling for the select element needs to be added back for the list items.

#panelbar .k-item > .k-state-selected
{
    /* control the colors when item is selected  */ 
    background-image: none; /* stop Kendo diffuser */
    color: #ffffff;
    background-color: Red;
}

In order to get the element’s box outline, add a border to the containing element. In this example, the containing element’s HTML is:

<ul id="panelbar"> 
</ul>

And the css to restyle the border is:

#panelbar
{
    border: 1px solid #000000; /* simple black border */
}

Demo Page (Index)

On the demo page, you will see three boxes. The first is an html <SELECT> with only enough styling to make it conform to the height, width, and page position for the demo. The second box is the CSS styled <UL> element using the Kendo panel bar control. The third box is the Kendo panel bar control with the default styling.


clip_image003


JavaScript (selectDDL.js)

The JavaScript is straightforward. The data is returned from the server then bound to the html elements (<SELECT> or <UL>) with knockout.js. After that, the Kendo panel bar control is attached to the html element. The click event for the middle box’s <LI> element grabs the <LI>’s text and places it into a <DIV> right below – just so you see something happen.

Since the Kendo Panel Bar doesn’t have to do much, except look pretty, the configuration of the control is minimal:

// Add control 
$("#panelbar").kendoPanelBar({
    expandMode: "single"
});

The right-most control shows all the items by default. That isn’t the expected behavior of an html <SELECT>element. In order to shorten the displayed items, and have the middle box to behave more like an html <SELECT>, the element is styled in jQuery after the Kendo control is attached to the <UL> element:

// size the control to not overflow box
$('#panelbar').css('overflow-x', 'hidden');

Download

The complete working Visual Studio 2010 project can be found on GitHub.


Summary

Restyling the Kendo Panel Bar to behave as an html <SELECT> element took very few changes to the css and JavaScript.